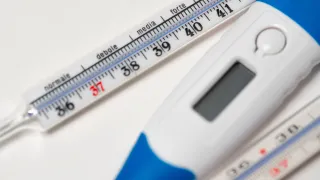
I was given a digital thermometer as a gift. It seemed easy, fast and reliable to use. I was grateful for the gift, as it allowed me to remove my well-served glass mercury thermometer from use. I would no longer need to fear the glass getting shattered and the mercury, which is hazardous to health, spreading all over the floor in small balls. The next time I had the flu, I took the new thermometer to use. Despite feeling feverish, the thermometer showed my body temperature to be normal. When I repeated the measurement, I got a few different readings, but they all seemed too low to me.
So, what should I have believed in? Was there something wrong with my thermometers or in the way I took my temperature or was I wrong about feeling feverish? Could the physiological or even psychological factors affecting me contribute to the measurement results?
Similar questions are encountered in all measurements, not only those related to our health, but everywhere. If we do not know to what extent we can rely on the measurement results, we cannot properly assess how we should react to them. In industry, process control is based on keeping the reliability of measurements at a planned level.
As individual consumers, we avoid being overcharged for products sold by weight, as statutory quality assurance is applied to the scales used in stores. Ensuring reliability is, therefore, an important part of measurement activities, but how is it implemented? The answer depends on the object we are measuring, but they all have five things in common. In the following I will study each of them in the light of my thermometer example:
1. Comparison to a known reference
This measure, called calibration, is an essential part of the periodic maintenance of any measuring device throughout industry. It uses a reference device to determine the error displayed by the measuring device.
My first step was also to take my temperature alternating between the new and the old thermometer. According to my old glass thermometer I seemed to have fever, but how could I know how accurately the old thermometer displays the right temperature? At home, you can reasonably easily produce some kind of a reference temperature by mixing water and ice (0°C) or by boiling water (100°C), but both of these were way too far from the temperatures measured using a thermometer. Thus, for me the only remaining option was to use the same method that is used in professional measurement quality assurance, i.e., a laboratory providing calibration services.
In Finland, there are several laboratories offering calibrations to corporate customers. The most accurate references in Finland, or the national measurement standards, can be found at VTT MIKES, which in turn calibrates reference meters for other calibration laboratories.
2. Assessment of error factors
All measurements are affected by various error factors. In my case, when I repeated the measurement several times, slightly changing the position of the thermometer in my armpit at the same time, I could easily conclude that the errors caused by the measurement method were more significant with the new thermometer than with the old one.
The temperature taken is also affected by physical activity and intake of food before the measurement. To establish an understanding of how reliable the measurement results are, we need to assess the error factors that affect the measurement object (in this case, body temperature), the measurement method (axillary method, duration of the measurement, etc.), the measuring device (thermometer), the measurement conditions (ambient temperature) and the competence of the person performing the measurement (e.g., ability to read a glass thermometer). The comparison of the measurements against the reference must also be taken into account.
Based on all these error factors, we can make a statistical assessment of the uncertainty of measurement. This numerical value indicates the reliability of the measurement result in a rather similar way as the error margin currently reported in surveys. A measurement result without an estimate of its reliability, i.e., the measurement uncertainty, is largely unusable, because a highly unreliable result can guide the decision-making in the wrong direction.
3. Ensuring competence
In measuring, the result largely depends on the competence of the person performing the measurement and the person assessing the result. Efforts are often made to reduce this dependency by using standardised methods and increasing automation. This shifts the focus of quality assurance related to competence to the application of methods and the validation of automation systems.
The assessment of the error sources described above is an important competence area related to measurements. In my thermometer case, the new digital meter eliminated my impact on the duration of measurement and the possibility of error related to how the glass thermometer is read. On the other hand, the new thermometer seemed to emphasise the competence associated with placing the thermometer correctly in the armpit.
4. Documentation
Criminal investigations or, for example, reminiscing the past between siblings often reveal how differently people remember the same thing and how often we forget many things altogether. When problems occur in measurement or the measurement results need to be improved, finding solutions or objects in need of improvement is often impossible or at least very difficult if no documentation has been made on the measurement results and methods used for measuring. I also found it necessary to record the results when comparing thermometers.
5. Internationally accepted measurement units as a basis
The reliability of measurements is based on the use of internationally accepted measurement units. For this purpose, VTT MIKES and other metrology institutes around the world maintain and develop the SI system of units. The reliability of any measurement is ensured by metrological traceability, i.e., an unbroken chain of calibrations from a measuring device to the realisation of the measurement unit in accordance with the unit definition at a metrology institute.
In my thermometer case, the reference chain started when I compared the new thermometer with my glass thermometer. Then I took the glass thermometer to VTT MIKES's temperature laboratory. There, it was compared to a digital measurement standard, which is regularly compared to more accurate reference standards. Finally, the calibration chain ended with the national realisation of the temperature unit at VTT MIKES. It should be noted that if the reliability is not verified and documented as described above in even one phase of the process, the chain is broken, and there is no traceability.
The World Metrology Day is celebrated on Thursday 20 May. This year its theme is Measurement for Health. The five things described above play a key role in verifying such measurements and, therefore, in ensuring the safety of us all. Independent evaluation (accreditation) is used both in the healthcare sector and more broadly in industry to demonstrate their implementation. The coronavirus pandemic has strongly highlighted the importance of health measurement. Various new analysis methods and, for example, the development of home diagnostics pose new challenges for the quality assurance of measurements.
And finally, let it be mentioned that the readings displayed by my new thermometer proved to be too low, and when I opened the device a little bit and examined it, I even found out what caused the problem...


